Applying shadows properly can boost your product photographs from beginner to professional. It makes the product appear more natural and realistic by giving it a touch of shape and depth.
The best aspect is that professional product photos do not require a large budget or a large staff. You simply need to devote some time to product photography and post-production.
In product photography, we love shadows. Shadows are a quick and easy technique to make your product photography look as polished and professional as the photographs of any e-commerce industry leader.
Below you will discover information about the significance of shadowing in product photography, the various shadow choices to consider, how to apply them to different types of products, and how to add shadows to your own product photographs.
In this article, you will get a proper concept of The Shadow Making Of A Product.
Table of Contents
ToggleWhat do you mean by shadow-making?
Photoshop shadow effects are a means of digitally altering an original image to give it a specific or desired appearance. You may add a shadow to an image to give it realism and the appearance of depth by using the correct Photoshop tools. The shadow effect in Photoshop increases the realism of any image.
An introduction to the types of shadow
There are three main categories of shadows to think about:
- Natural Shadow
- Drop shadow
- Reflection shadow
Natural Shadow
[image-1]
A natural shadow is a shadow that would naturally be created by your object if it were placed in direct sunlight.
A natural shadow has the benefit of being one of the simpler shadowing effects to create. You can set up your scene with one light source if you know in advance that you want to use a natural shadow. And possibly keep one reflector panel on the “darker” side. Then the product’s shadow can be captured, creating a shadow effect without the need for post-production.
Drop Shadow
[image-2]
Imitating the shadowing that happens when direct sunlight is shining down on an object, drop shadows create the appearance that a product is being photographed from above. Instead of your goods appearing to float freely on an all-white background, this helps give your image some context.
Drop shadows are very useful for furniture. It gives the customer the impression that the product is sitting on a surface, just like it would be in their house.
Reflection Shadow
[image-3]
Reflection shadows are a stunning shadowing effect that gives your product a refined appearance. In the process, the product appears to be sitting on a reflective surface. Reflections and shadows are excellent for adding realism to objects such as sunglasses, watches, and jewelry that you may envision appearing in a display case or reflecting shelf.
Control your lighting to eliminate reflections or light spots that may emerge on your product to save time in post-production. Of course, those can be removed in post-production. But you can save time by setting up your scene using our instructions on how to photograph an extremely reflective object.
There are some other types of shadows being described here:
Retain Original Shadow
Controlling the original shadows while taking images can be challenging for a variety of reasons. There can be bad lighting, an inappropriate background choice, improper camera settings, and more. Whatever the reason, we must be able to see through it. That’s why keeping the original shadow preserves its place in the shadow-making process.
Soft Edges
Soft edge shadows soften the transitions between layers by using softening techniques. They assist in the smoothing out of the final piece’s edges. The fact that this method doesn’t require extra work is its best feature. Place one of the layers behind the others, then change the Blending Mode settings to reflect this.
Hard Edges
Three types of hard-edged shadows are often available: gradient, reflection, and bevel/emboss. Multiple colors that gradually fade away from one another compose gradients. Since gradients are formed of multiple colors, they have a tendency to affect each pixel individually, making them ideal for shading.
Follow the procedures indicated below to ensure that the Background Layer contains no color before adding a gradient effect.
- Press Ctrl + J or Command + J to duplicate the Background Layer.
- Change the Blend Modes of both copies to Linear Light.
- Next, drag a rectangle of the proper color anywhere within the cloned layer. This results in a gradient pattern that will serve as our foundation.
- Reduce the opacity of the original layer to around 2 percent.
- If the bottom half appears excessively dark in comparison to the viewable section, increase the Opacity of the original layer.
Layer Shadow by Default in Photoshop
You may also make the best shadows with an amazing application called “Photoshop Shadow Layers.” This is an application developed by a third party that may be downloaded from the internet. Nonetheless, there is an issue with this method. When utilizing a third-party application, shadows are not always reproduced correctly. Even some elements can go missing. It is not suggested to create shadows with third-party software.
Photoshop offers a staggering variety of choices for producing shadows. You have the option of applying a “stage” to your image, or you can change it using a channel palette. The stage is essentially a gradient that provides depth to the Photoshop shadow. Each hue in the gradient symbolizes a different shadow color.
How to Get Professional Shadowing Without Spending Extra Time on Retouching
There is one disadvantage to adding shadows to your product images: they take more time in post-production to produce. As a result, your retouchers will need more time to edit the product photographs. Additionally, producing hundreds or thousands of product photos can add significantly to your creative operations’ overhead.
Hire a business like OverNight Graphics to handle your image editing as a possible answer. For some of the biggest retail and e-commerce firms worldwide, we have edited and added shadows to literally millions of photographs.
How to do drop shadow?
Drop Shadow is a simulated procedure for adding a realistic shadow to a subject. Only a few steps are required to create a realistic shadow in Photoshop. Those are described below:
Step 1: Isolate the Photo Subject
To add a shadow to a photograph, you must first isolate the subject. The tools for selection are essential in making the best use of your operation. Isolate the selected region with the Photoshop shortcut Ctrl/Command+J (Windows/Mac).
Step 2: Create A Drop Shadow
We don’t need the original shot because we’ve divided the subject into a new layer. As a result, you can conceal the background layer and focus solely on the subject layer. Now, double-click the layer and select ‘Drop Shadow’ from the layer style window’s left panel.
Step 3: Changing the Shadow
You can make certain tweaks and modifications in the Layer Style window. You can still make some enhancements by separating the shadow from the subject layer’s impact. Simply right-click on the effect and select ‘Create Layer.’ Alternatively, go to Layer>Layer Style>Create Layer.
They act in the same manner. Use the Transform Tool by selecting the Shadow layer and pressing Ctrl (for Windows) or Command (for Mac)+T. For Windows and Mac, press Ctrl, Command, Alt, Option, and Shift to change the shadow skew. To alter, simply click and drag from any point on the transform choice.
Step 4: Adding Extras
You can go above and above in light of your subject’s requirements. You can also do this for some additional effects. For example, you may double the shadow or create a reflection shadow. The shadow is not exactly an automated shadow operation, but it serves the purpose. Also, the shadow you need to place underneath the subject is a type of drop shadow.
Step 5:Finalizing
Finalizing is the most critical phase in any type of photo editing because a single error can ruin the entire process. Examine the image carefully to see if there are any imperfections. You may need to reduce the opacity of the shadows or remove parts of them at times. Be careful not to obscure or remove any crucial components of the subject or the shadow.
The Use Of Products Shadow Making
You will see various instances of shadow adding below. Shoes, furniture, and jewelry are the topics we’re addressing. We think the examples’ accompanying photographs and descriptions will be useful.
On Shoe
Making realistic shadows by Photoshop operations for shoe items is an intelligent type of post-production. We have selected the shadow addition based on the photograph. We also have isolated the shadow and altered it as needed. The steps we took to produce realistic shadows are shown in the figure below.
[image- 4]
To reveal and conceal the shadow qualities and locations, we have used masks and the Brush Tool. We made additional adjustments using the Transform Tool, including skewing, alignments, rotation, and positioning. For the best topic selection and isolation, We have employed the Clipping Path operation. For the subjet image you have, you can utilize various selection tools.
On Furniture
[image-5]
The operation we performed for shoes is slightly different from the shadow addition to furniture. Focusing on the foundation of the furniture is crucial in this case, and the shadow should reflect that. We shall carry out all of the tasks in the order described above. The “Skew” adjustments, made in accordance with the subject, are what concentrate the image.
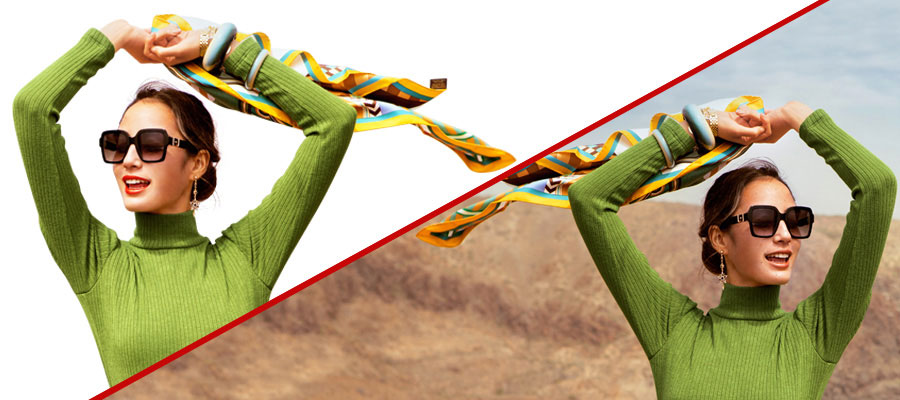
On Jewelry
[image-6]
Jewelry is a luxury item that requires a clever presentation, unlike other products. Applying a drop shadow is possible using the method described above. For this type of product, we recommend using the Reflection shadow/Mirror effect. Creating realistic shadows in Photoshop is far less difficult and requires less work. However, the reflection shadow can significantly enhance the visual impression.
Initially, we draw a path around the ring and isolate it on a separate layer from the existing background. For this example, a white background should be used. The ring is then duplicated and flipped vertically. To activate the Transform Tool, use Ctrl/Command+T on a Windows or Mac computer. Re-right-click the picture and choose “Flip Vertical.”
Place this duplicate beneath the original ring and slightly alter its shape. We have slightly lowered the height to create a pertinent shadow for the ring’s view. But hold on. There is more work to be done on the editing. We mask it and slightly reduce the opacity. Using the brush tool and black as the foreground color, we apply a 10% flow to the lower portion. In Photoshop, you have all the possibilities.
Conclusion
That was all for making a realistic drop shadow in Photoshop, along with a little explanation. Only when you complete the project yourself will it be useful. Additionally, if you need to learn, you can find realistic shadow illustrator tutorials online. However, there is no denying that Photoshop makes the operation much more efficient and convenient. Do your best to follow the instructions, be sensible, and apply common sense. One additional thing: use a black background for the jewelry reflection shadow for a more eye-catching appearance.
This article will help you to understand the shadow-making of any products in your online business. It helps to attract your consumer deeply. For making a perfect shadow on your products you have to choose an expert to get better output. OverNight Graphics can help you to get your desired product’s shadow.